XiFanU 发布的文章

第三方 shell 终端,美到极致,推荐娱乐和普通使用。

1.安装 zsh

yum -y install zsh

2.切换默认 shell 为 zsh

chsh -s /bin/zsh

重启机器立即生效,也可以等切换主题后再 reboot 重启。

3.安装 on my zsh

curl
sh -c "$(curl -fsSL https://raw.githubusercontent.com/robbyrussell/oh-my-zsh/master/tools/install.sh)"
wget
sh -c "$(wget https://raw.githubusercontent.com/robbyrussell/oh-my-zsh/master/tools/install.sh -O -)"

重启机器立即生效,也可以等下一步切换主题后再 reboot 重启。

4.修改 oh my zsh 主题

查看 oh my zsh 主题

ls ~/.oh-my-zsh/themes

显示如下

3den.zsh-theme           dst.zsh-theme              
itchy.zsh-theme          mira.zsh-theme                  
smt.zsh-theme            adben.zsh-theme          
duellj.zsh-theme         jaischeema.zsh-theme      
mlh.zsh-theme            Soliah.zsh-theme
af-magic.zsh-theme       eastwood.zsh-theme         ...等等

默认的主题是 ZSH_THEME="robbyrussell" ,
修改主题:

vim ~/.zshrc

#  :wq
#  保存

最后 reboot 重启生效

某些 VPS 带宽长时间超速,容易引发厂商主动 QOS 甚至被短时间的断网。
使用 iptables 防火墙对端口进行适当程度的限速。

需要安装 iptables,注意限速规则 Rule ,不要受到其他 Rule 规则的影响!

iptables 8080端口限速命令:

iptables -A OUTPUT -p tcp --sport 8080-m limit --limit 1000/s --limit-burst=10 -j ACCEPT
iptables -A OUTPUT -p udp --sport 8080-m limit --limit 1000/s --limit-burst=10 -j ACCEPT
iptables -A OUTPUT -p tcp --sport 8080-j DROP
iptables -A OUTPUT -p udp --sport 8080-j DROP

上面的命令意思是:8080的上行带宽,每秒产生 1000 的数据包,初始的数据包数量是10个,对超过带宽的数据包进行阻止(不会导致丢包或者端口)。

带宽粗略计算方法: 1000/s x MTU(默认1500字节) = 1000 x 1500 = 1500000 Bytes
折算成网速则为:1.43M/s

前提

一个域名
域名已经解析到服务器

更新源

apt update && apt upgrade

安装 Nginx

apt install nginx -y

查看 Nginx 版本

nginx -v

查看 Nginx 运行状态

systemctl status nginx

此时访问 http://your_server_ip 会看到 Nginx 欢迎页面

设置 Nginx 站点

mkdir -p /var/www/yourdomain/html
chmod -R 755 /var/www/yourdomain

增加网站首页页面文件

vi /var/www/yourdomain/html/index.html

键入以下内容:

<html>
  <head>
    <title>MY Website!</title>
  </head>
  <body>
    <h1>Success!!</h1>
  </body>
</html>

创建网站配置文件

vi /etc/nginx/sites-available/yourdomain.conf

键入以下内容:

server {
  listen 80;
  listen [::]:80;
  root /var/www/yourdomain/html;
  index index.html index.htm index.nginx-debian.html;
  server_name yourdomain;
  location / {
    try_files $uri $uri/ =404;
  }
}

启用 Nginx 服务块,将配置文件从站点链接到 Nginx 目录中启用的站点

ln -s /etc/nginx/sites-available/yourdomain.conf /etc/nginx/sites-enabled/

修改、优化配置

vi /etc/nginx/nginx.conf

取消此行注释

server_names_hash_bucket_size 64;

验证 Nginx 配置

nginx -t

如果没有错误,则会输出以下内容:

nginx: the configuration file /etc/nginx/nginx.conf syntax is ok
nginx: configuration file /etc/nginx/nginx.conf test is successful

重启 Nginx 使配置生效

systemctl restart nginx

使用 Let's Encrypt 签发 SSL 证书,开启 HTTPS

首先安装 certbot 包

apt install python3-certbot-nginx -y

开始创建、签发 SSL 证书

certbot --nginx --agree-tos --redirect --hsts --staple-ocsp --email youremail@mail.com -d your_domain.com

现在使用 https://yourdomain 访问你的网站,HTTPS已成功开启。

自动更新 Let's Encrypt 证书

Let's Encrypt 证书在 90 天后过期。使用 crontab 定期来检测、更新证书。

crontab -e

下面命令的含义:每天凌晨 8 点,检查服务器上的证书是否会在接下来的 30 天内过期,如果是,则更新它。
使用 --quiet 指令使 certbot 不输出日志信息。

0 8 * * * /usr/bin/certbot renew --quiet

保存并关闭 crontab 文件。
所有证书将自动续期。

安装 rclone

下载安装 rclone:

curl https://rclone.org/install.sh | bash

配置 rclone

安装完成后输入以下命令进行配置:

rclone config

输出:

2021/09/26 19:14:46 NOTICE: Config file "/root/.config/rclone/rclone.conf" not found - using defaults
No remotes found - make a new one
n) New remote
s) Set configuration password
q) Quit config

输入 n 新建配置。

name 可以随便输入,

然后会出现挂载的服务类型,如下:

Type of storage to configure.
Enter a string value. Press Enter for the default ("").
Choose a number from below, or type in your own value
 1 / 1Fichier
   \ "fichier"
 2 / Alias for an existing remote
   \ "alias"
 3 / Amazon Drive
   \ "amazon cloud drive"
 4 / Amazon S3 Compliant Storage Providers including AWS, Alibaba, Ceph, Digital Ocean, Dreamhost, IBM COS, Minio, and Tencent COS
   \ "s3"
 5 / Backblaze B2
   \ "b2"
 6 / Box
   \ "box"
 7 / Cache a remote
   \ "cache"
 8 / Citrix Sharefile
   \ "sharefile"
 9 / Compress a remote
   \ "compress"
10 / Dropbox
   \ "dropbox"
11 / Encrypt/Decrypt a remote
   \ "crypt"
12 / Enterprise File Fabric
   \ "filefabric"
13 / FTP Connection
   \ "ftp"
14 / Google Cloud Storage (this is not Google Drive)
   \ "google cloud storage"
15 / Google Drive
   \ "drive"
16 / Google Photos
   \ "google photos"
17 / Hadoop distributed file system
   \ "hdfs"
18 / Hubic
   \ "hubic"
19 / In memory object storage system.
   \ "memory"
20 / Jottacloud
   \ "jottacloud"
21 / Koofr
   \ "koofr"
22 / Local Disk
   \ "local"
23 / Mail.ru Cloud
   \ "mailru"
24 / Mega
   \ "mega"
25 / Microsoft Azure Blob Storage
   \ "azureblob"
26 / Microsoft OneDrive
   \ "onedrive"
27 / OpenDrive
   \ "opendrive"
28 / OpenStack Swift (Rackspace Cloud Files, Memset Memstore, OVH)
   \ "swift"
29 / Pcloud
   \ "pcloud"
30 / Put.io
   \ "putio"
31 / QingCloud Object Storage
   \ "qingstor"
32 / SSH/SFTP Connection
   \ "sftp"
33 / Sugarsync
   \ "sugarsync"
34 / Tardigrade Decentralized Cloud Storage
   \ "tardigrade"
35 / Transparently chunk/split large files
   \ "chunker"
36 / Union merges the contents of several upstream fs
   \ "union"
37 / Webdav
   \ "webdav"
38 / Yandex Disk
   \ "yandex"
39 / Zoho
   \ "zoho"
40 / http Connection
   \ "http"
41 / premiumize.me
   \ "premiumizeme"
42 / seafile
   \ "seafile"

直接输入序号,比如我挂载的是 OneDrive 就可以输入 26

client_id 可以直接回车默认,

client_secret 也可以直接回车默认,

然后会出现 OneDrive 区域选择,如下:

Choose national cloud region for OneDrive.
Enter a string value. Press Enter for the default ("global").
Choose a number from below, or type in your own value
 1 / Microsoft Cloud Global
   \ "global"
 2 / Microsoft Cloud for US Government
   \ "us"
 3 / Microsoft Cloud Germany
   \ "de"
 4 / Azure and Office 365 operated by 21Vianet in China
   \ "cn"

可以直接输入 1 选择全球,

然后是选择是否进行高级配置,如下:

dit advanced config? (y/n)
y) Yes
n) No (default)

可以输入 n

接着是自动配置选择,如下:

Remote config
Use auto config?
 * Say Y if not sure
 * Say N if you are working on a remote or headless machine
y) Yes (default)
n) No

可以输入 n

这里需要获取授权码:

For this to work, you will need rclone available on a machine that has
a web browser available.

For more help and alternate methods see: https://rclone.org/remote_setup/

Execute the following on the machine with the web browser (same rclone
version recommended):

    rclone authorize "onedrive"

Then paste the result below:

授权码需要在本地电脑上获取,访问 https://rclone.org/downloads/ 根据你的电脑系统版本下载对应的 Rclone。

下载完成后解压,进入存放 Rclone 的目录,以 Win10 为例,打开 Powershell ,我的 Rclone 放在 D:\Software\rclone-v1.56.1-windows-amd64 ,我可以输入:

cd D:\Software\rclone-v1.56.1-windows-amd64

在存放 Rclone 的目录可以看到 rclone.exe 的可执行程序,输入:

./rclone authorize "onedrive"

浏览器应该会自动打开,如果浏览器没有打开可以根据提示复制地址访问。如果浏览器登录了 OneDrive 的话会直接显示授权确认信息,如果没有登录的话会弹出登录页面,登录 OneDrive 后也会显示授权确认信息,选择 接受 后在 powershell 命令行会显示一串 JSON 格式的授权信息;
复制下来整个JSON,粘贴至 Linux 终端。

然后是选择 OneDrive 的类型,如下:

Choose a number from below, or type in an existing value
 1 / OneDrive Personal or Business
   \ "onedrive"
 2 / Root Sharepoint site
   \ "sharepoint"
 3 / Sharepoint site name or URL (e.g. mysite or https://contoso.sharepoint.com/sites/mysite)
   \ "url"
 4 / Search for a Sharepoint site
   \ "search"
 5 / Type in driveID (advanced)
   \ "driveid"
 6 / Type in SiteID (advanced)
   \ "siteid"
 7 / Sharepoint server-relative path (advanced, e.g. /teams/hr)
   \ "path"

可以输入 1

然后会显示找到的 OneDrive 账户,如下:

Found 1 drives, please select the one you want to use:
0: OneDrive (business) id=b!b_xnJJqyBMSVPjgvhvbP8XmJ_M_dMjhzrbhnaWknnbKqNBm8MTqM3kvEtW67P

根据提示输入序号,

这里会根据你输入的序号查找账户,如下:

Found drive 'root' of type 'business', URL: https://xxx-my.sharepoint.com/personal/changbin_xxx_onmicrosoft_com/Documents
Is that okay?
y) Yes (default)
n) No

确认无误后输入 y

接着会显示你选择的配置信息,确认无误后输入 y 保存配置。

挂载

例如我要把一个名为 myOD 的配置挂载到本地的 /home/OneDrive 目录,我可以这样写:

rclone mount myOD:/vps /home/OneDrive --copy-links --no-gzip-encoding --no-check-certificate --allow-other --allow-non-empty --umask 000

我这里挂载的是 OneDrive 网盘中的 “vps” 文件夹,所以我写的是 OneDrive 的目录 /vps

执行完后如果出现类似 NOTICE 的提示,忽略即可。

挂载完成后不会显示任何内容,可以再开一个终端,输入 df -h 查看磁盘空间情况。

VPS重启自动挂载

执行完上面的命令,如果关闭终端,挂载则会失效。

解决办法就是将上面的命令放到开机启动脚本中去。例如使用 rc.local 或注册一个 systemd 服务。

本教程暂略。
本教程适用于Debian、Ubuntu

IPv6 通道使用了 HE Tunnel Broker 的免费服务,每位用户可以创建5个隧道

创建 Tunnel Broker 账号

  • 注册 Tunnel Broker 账号,地址: https://tunnelbroker.net/
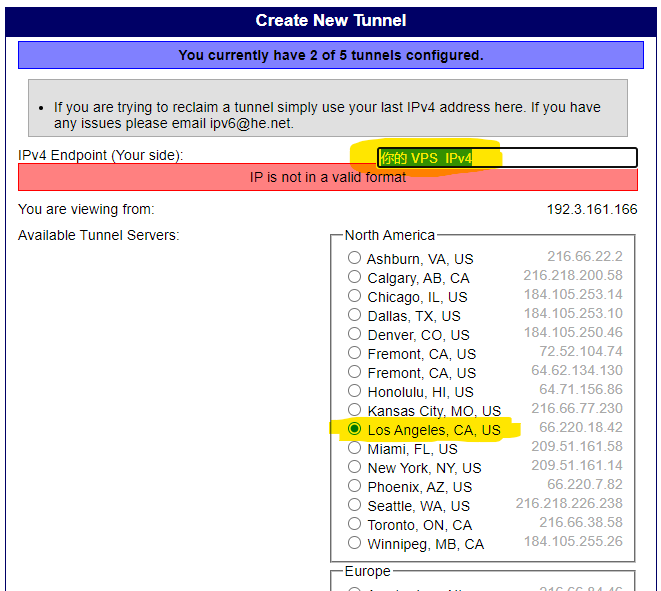
  • 点击左侧的 Create Regular Tunnel
  • 输入 VPS 的公网 IP 地址
  • 根据 VPS 的位置选择一个合适的节点,选择延时低的效果最佳
  • 页面拉到最下方,点击Create Tunnel

tunnelbroker-creat.png

获取配置示例

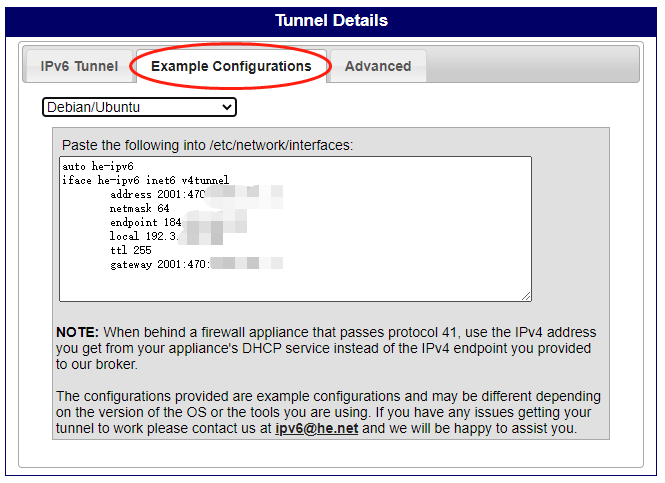
在 Tunnel Details 页面有个 Example Configuration 选项卡,在这里你可以选择合适的配置示例。就比如这里有 De­bian/​Ubuntu 的 interfaces 配置文件示例:
Tunnel Details.jpg
只要基于 De­bian 的发行版和使用 interfaces 配置文件的系统理论上都可以使用。
其它不兼容的发行版则可以使用 Linux-net-tools 或 Linux-route2 示例手动输入命令。

添加网络接口

he-ipv6 配置文件添加到 /etc/network/interfaces 文件尾部;

vi /etc/network/interfaces
auto he-ipv6
iface he-ipv6 inet6 v4tunnel
        address 2001:xxx:xxxx:xxxx::2
        netmask 64
        endpoint 216.66.xx.xx
        local 233.233.233.233
        ttl 255
        gateway 2001:xxx:xxxx:xxxx::1

he-ipv6 配置文件添加到 /etc/network/interfaces.d/ 目录下

tee /etc/network/interfaces.d/he-ipv6 <<EOF
auto he-ipv6
iface he-ipv6 inet6 v4tunnel
        address 2001:xxx:xxxx:xxxx::2
        netmask 64
        endpoint 216.66.xx.xx
        local 233.233.233.233
        ttl 255
        gateway 2001:xxx:xxxx:xxxx::1
EOF

如果是 NAT VPS 则需要替换local字段后面的公网 IP 地址为内网 IP 地址。

启用 IPv6 隧道

  • 安装网络工具包

    apt update
    apt install net-tools iproute2 -y
  • 启动 he-ipv6 网络接口

    ifup he-ipv6
  • 启用后执行 ifconfig 命令,这时应该有一个 he-ipv6 接口。
  • 若没有生效可以尝试重启网络

    systemctl restart networking

DNS 设置

编辑 /etc/resolv.conf 文件,更改 DNS 解析服务器为支持查询 AAAA 记录的 DNS 服务器

nameserver 8.8.8.8
nameserver 8.8.4.4

不建议使用 IPv6 地址的 DNS ,因为通过 IPv6 隧道去请求可能会拖慢 DNS 解析速度。

检测 IPv6 支持

执行 ping6 google.com 命令,能 ping 通说明 VPS 已经支持 IPv6 网络了。

如果是 NAT VPS ,除了前面提到的替换 IP 操作以外,可能还需要一些额外的设置,否则可能还是无法访问 IPv6 网络。

  • NAT 配置防火墙允许 41 端口入站

    ufw allow 41
  • NAT 添加相关的路由规则

    route -A inet6 add ::/0 dev he-ipv6

优先使用 IPv4 网络

默认情况下 IPv6 网络优先级会高于 IPv4 ,为了防止 IPv6 隧道拖慢 VPS 的正常网速,可以设置优先使用 IPv4 网络。

编辑 /etc/gai.conf 文件,在末尾添加下面这行配置:

vi /etc/gai.conf
precedence  ::ffff:0:0/96   100

删除 IPv6 隧道

当你不想用了,或者想使用其它方式访问 IPv6 网络时,记得先删除。

  • 停用隧道

    ifdown he-ipv6
  • 删除 he-ipv6 网络接口配置文件(若没有删除重启后会自动启用)

    rm -f /etc/network/interfaces.d/he-ipv6